First things first. If you’re testing software and you’re not using some sort of virtualization solution, stop reading this and go install one. My product of choice is VirtualBox. It’s free (as in no cost and most of it is open source), user friendly, runs on an Ubuntu host computer and I’m familiar with it.
Lately I’ve been doing a lot of testing of the Ubuntu One desktop software and I need to be able to quickly get various versions of Ubuntu up and running. Below I outline how I do that on an Ubuntu host computer. My steps assume that you’re familiar with VirtualBox enough that you know how to setup a virtual machine (VM) already.
Create a master image
The master image is the one we’ll use to clone test images off of. By doing this we can worry about keeping our master image up-to-date and configured the way we need it and then simply clone that image when we have to test.
- Create a new VM in VirtualBox and install the OS (see Lifehacker’s guide if you’re not sure how to do this)
- After restarting the VM when the install is done, install all the latest updates on the master image and restart
- Install the VirtualBox Guest Additions (allows nice integration with the host computer)
- Shutdown the master image
Periodically you’ll want to make sure your master image has all the latest updates, so just boot it up, install the updates and then shut it down.
Clone the master image
Now we’re ready to start testing some software. Instead of using the master image we created above, we’re going to clone that image. This should take less than 5 minutes start to finish.
- In a terminal session do the following:
cd ~/.VirtualBox/HardDisks
VBoxManage clonehd master_image.vdi test_image.vdi --format VDI
- In VirtualBox, create a new VM by clicking the New button
- Go through each screen selecting the appropriate values and clicking the Next button until you get to the Virtual Hard Disk part
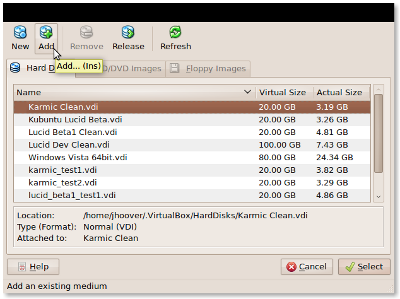
- Select the Use existing hard disk radio button

- Click on the folder icon next to the pull down menu listing existing VDI files
- Click the Add button

- Select the image you created (should be in ~/.VirtualBox/HardDisks) to add it to the list of available hard disks
- Click on the image you just added and then click the Select button
- Click the Next button
- Click the Finish button
You now have a brand new VM to use for testing. Once you test with this image and decide its usefulness is over you can delete the virtual disk image (VDI) file in ~/.VirtualBox/HardDisks, repeat step 1 above to create a new cloned image, and then edit your cloned VM in VirtualBox to use the new clone image. In other words, you don’t have to setup a new VM (steps 2-10) every time you want to use another VDI if you don’t want to.